Grab every opportunity to reach people ready to buy by monitoring interactions with your business. Here’s how to set up ad tracking in the Meta Events Manager.
Let me guess… you want to ensure you spend your advertising budget efficiently and market to people more likely to purchase because they’re genuinely interested in what you sell.
You may have tried running Meta ads with unremarkable or irrelevant results - reaching people who don’t bite.
How do you fix this? With Facebook Events Manager.
No, I’m not talking about a party planner. The Events Manager lets you track events or actions taken on your website.
Let’s take a look.
What is Meta (Facebook) Events Manager?
Advertising without a Pixel or dataset is pointless. You simply burn money if you don’t rely on tracking data to inform your ad campaigns. While the Meta Pixel tracks web activity, the Events Manager tool helps to identify audiences to market to based on this activity.
The Meta Events Manager lets you track different actions taken on your website to help you segment your target audiences based on this activity. Then, by creating ads that encourage the user to complete these actions (events), you can increase the likelihood of a conversion.
The Events Manager is where you can create your Meta Pixel or Dataset. Here, you also define which events are most important to your business.
With events measurement, you can gain valuable data about which users have taken specific actions on your website and reach them through retargeting. Understanding the behavior of different users on your website can help you determine who to focus on and how to hook them.
Conversion events and data source types
Before we begin, you should know that Meta is gradually phasing in Datasets instead of the Meta Pixel. As such, your experience may differ with the Events Manager and Business Manager as they’ve restructured the menu options.
Web data sources
When it comes to data sources for collecting event info, you have three options:
- Meta Pixel - A piece of code installed on your website that uses cookies to track user activity on your site and match these actions to their Facebook profiles. Using your Facebook Pixel helps you log conversion events, and you can choose what and how to track them.
- Conversions API - An API protocol that sends events directly to Meta, bypassing the web browser as a server-to-server solution. As it comes from your server, you own the data versus the third-party pixel data. This method is the most flexible and reliable server-to-server (S2S) solution around.
- Facebook SDKs for Android and iOS - Used to track up to 67 different types of app events like downloads, purchases, and other actions.
The privacy restrictions in place make it difficult for advertisers to rely on using the Meta Pixel alone to track events. You must use the Pixel or dataset at the bare minimum, but using it in conjunction with the Conversions API is the best option by far.
Furthermore, using a tool like Madgicx Cloud Tracking means you can plug into Meta seamlessly without hiring any devs or complex configuration on your part - we set up the Conversions API and Enhanced Conversions for you. Madgicx does all the heavy lifting for you to ensure you gather accurate first-party data. Best of all, you can try it free for 7 days!
Standard events
As part of Meta’s Aggregated Events Measurement, you no longer need to configure your events or prioritize the web events yourself - Meta does it for you. You simply connect your data sources. Furthermore, you may not need to verify your domain either.
Meta has a predefined list of events suitable for most businesses, which you can track with the Facebook Pixel or dataset. Using this data, you can build audiences, log conversions, and optimize for conversions. You can have up to 8 standard events, so select the most relevant to your business. Here is the list of Meta’s standard events:
- Add payment info
- Add to cart
- Add to wishlist
- Complete registration
- Contact
- Customize product
- Donate
- Find location
- Initiate checkout
- Lead
- Purchase
- Schedule
- Search
- Start trial
- Submit application
- Subscribe
- View content
Custom conversions
If the event you want to track isn’t on Meta’s predefined standard events, you can define your own. You would do this when you want to be even more specific about the event you’re tracking.
For example, you can create a custom event that filters data from a standard event, like tracking purchases of women’s shoes over $50. By doing this, you can create a new audience to advertise women’s shoes with a higher likelihood of conversion for a similar value, as opposed to other purchase types.
Custom conversions are a powerful tool to segment your retargeting audiences even more. You can use them to filter different types of purchases or other actions. However, you still want to track your standard conversions so that you can gather all your purchase data as well.
Offline data sources and events
Not all trackable conversions or events happen online, which is why Meta supports offline conversions. These real-world events can include in-store purchases, phone calls, chats, appointment bookings, interactions with your call center, or even your CRM software.
You can create an offline dataset or use the Conversions API to track these events so you don’t lose this data. Furthermore, tracking these events helps you attribute your conversions to the Facebook ads responsible so you can keep track of which ads lead to sales in the buying journey.
Meta is phasing out the Offline Conversions API as the new Conversions API supports offline conversions. Meta advises anyone using the Offline Conversions API to convert to the Conversions API. It also recommends not to update the Offline Conversions API during the transition until you’ve successfully changed over.
Welcome to Facebook Events Manager
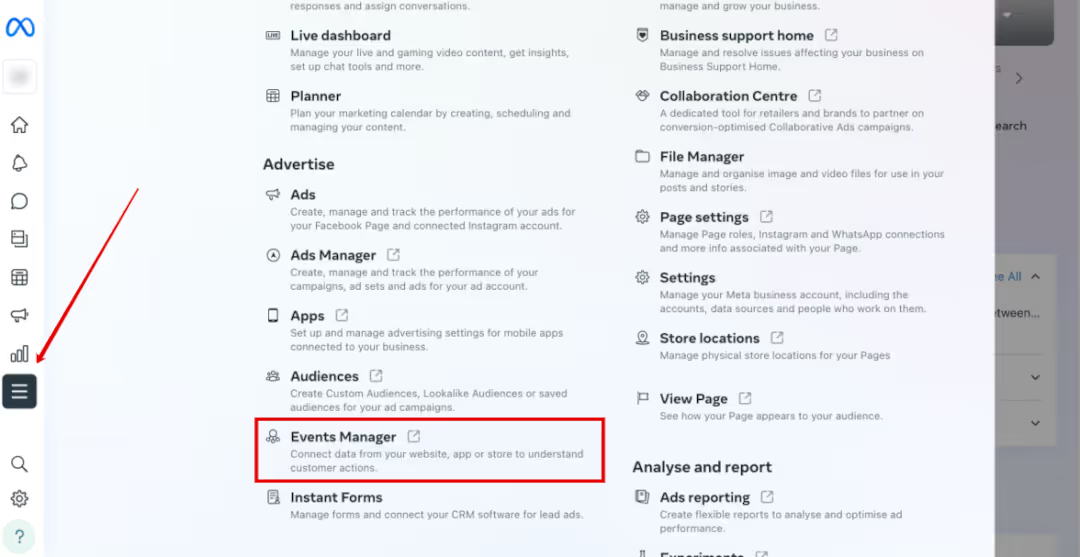
You can find the Events Manager by clicking here or logging into your Meta Business Manager or Meta Business Suite account and clicking the ‘All tools’ button with the three lines. A menu will pop up, and you’ll find Events Manager in the ‘Advertise’ section.
Overview
On the ‘Overview’ page, you’ll find a rundown of the status quo of your events displayed in a graph and table. If you want a quick run-through of how it works, click the purple ‘See How It Works’ button at the top of the page.
Below this, you’ll find the status of your website connection, including your dataset or Pixel ID. If the signal icon is red, there is a problem. If it’s green, you’re good to go. If it’s grey, it needs more time to gather data, which is what you’ll see if you’ve just connected it.
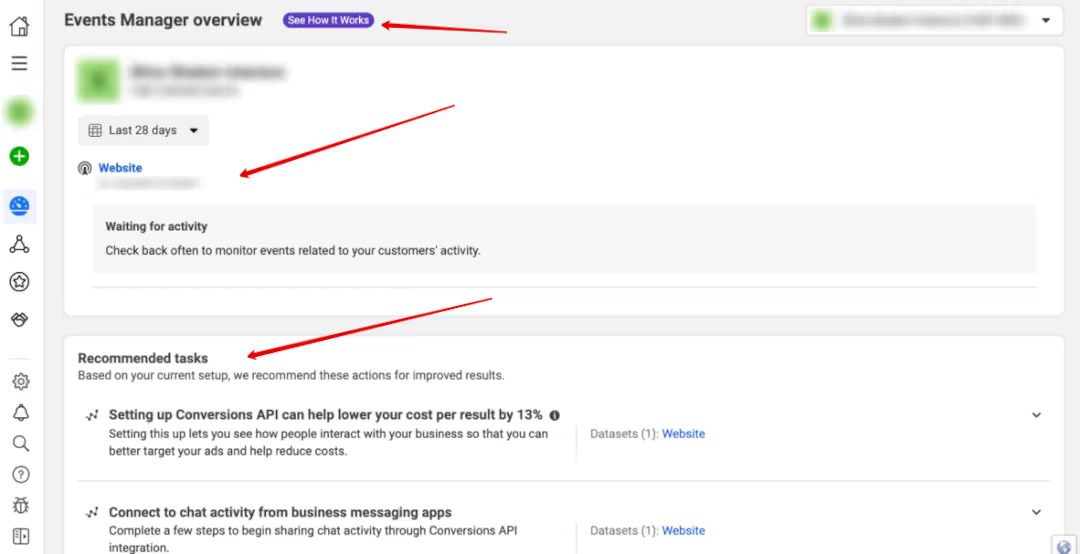
At the bottom, you’ll see a list of recommended tasks to complete your events setup. Anything that requires your attention will show on this page, including the status of your data sources and events.
Once you’ve added your events (we’ll cover this further down), you can see them by selecting your Pixel and viewing your event graph and table on the ‘Overview’ page.
Data sources
On the ‘Data sources’ tab, you’ll find a list of all the data sources connected to your business account. You can test your events, diagnose problems, view historical data, and adjust any settings relating to each data source.
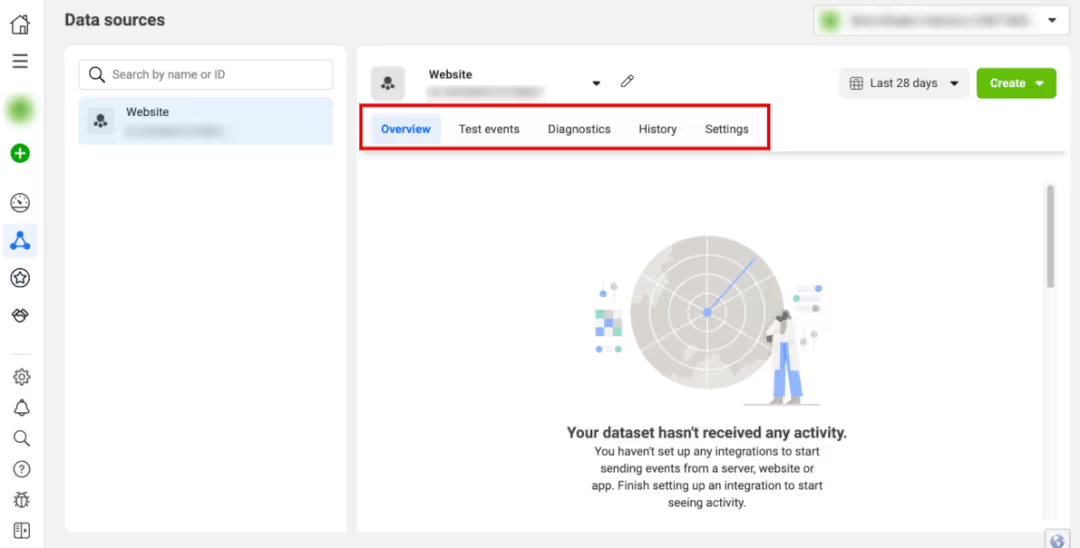
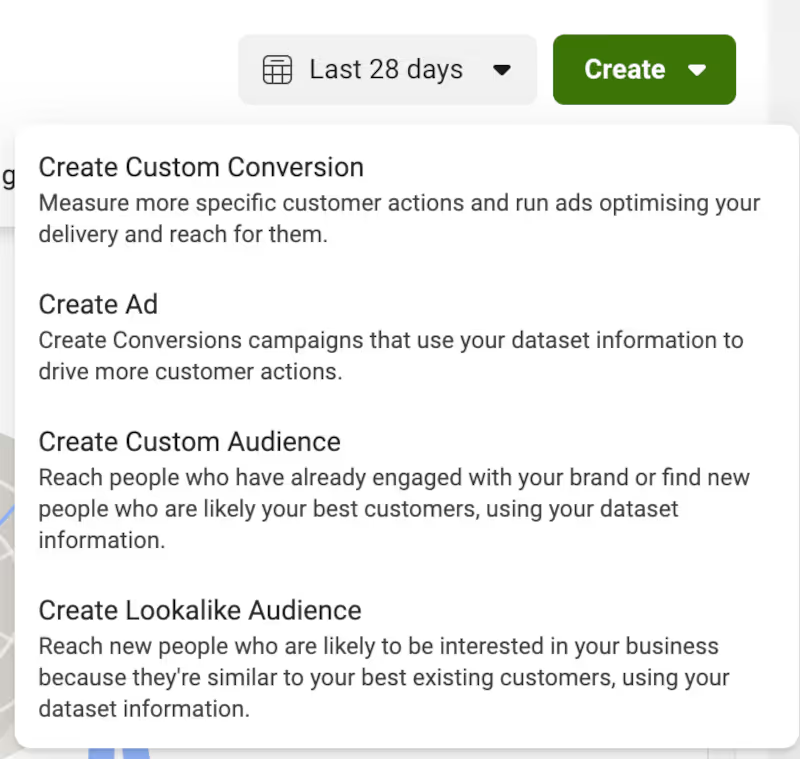
When you click on the ‘Create’ button, you can create new events, custom conversions, ads, custom audiences, and lookalike audiences based on your dataset info.
You can also manage your datasets or Meta Pixel here by clicking the edit icon (pencil). You can make changes or delete your dataset or Facebook Pixel here if you don’t need it anymore.
Custom Conversions
You can create a custom conversion once your events have been set up (either standard or custom ones.) It allows you to associate certain events or sequences as a conversion.
On this tab, you should see the blue ‘Create Custom Conversion’ button as your only option. In the future, all your custom conversions will show here, where you can view their data or make any adjustments. We’ll come back to how to create custom conversions a bit later.
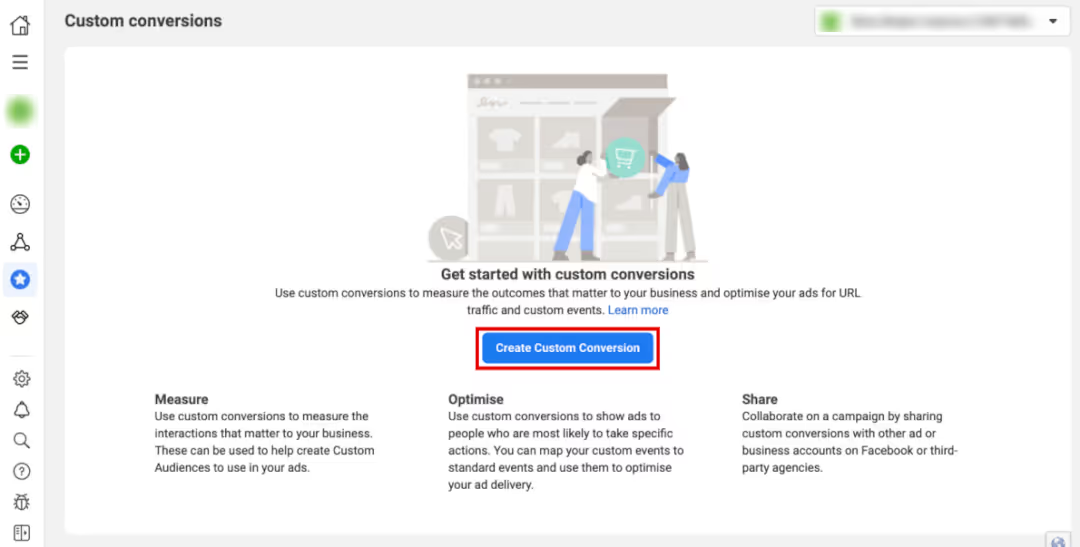
As with the standard events, you can easily edit or delete your custom conversions on this tab by clicking the edit icon.
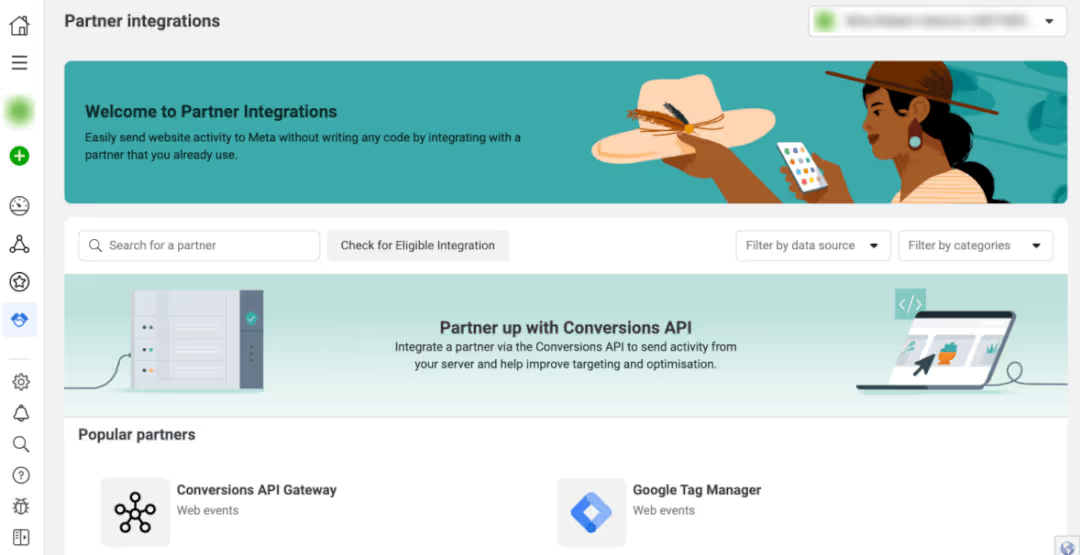
Partner Integrations
In the Partner Integrations tab, you’ll find a list of available integrations to connect to your account. These include platforms for e-commerce, website, customer data, and data connection, CRM and marketing software, tag management, and mobile platform integrations. You’ll see plenty of options on the list that cater to all business types.
How to set up Facebook Events Manager
Now you’ve seen the lay of the land, it’s time to set up your Events Manager.
1. Create and connect a Facebook Pixel or dataset
I. To set things up, click the blue ‘Connect Data’ button (your only option).
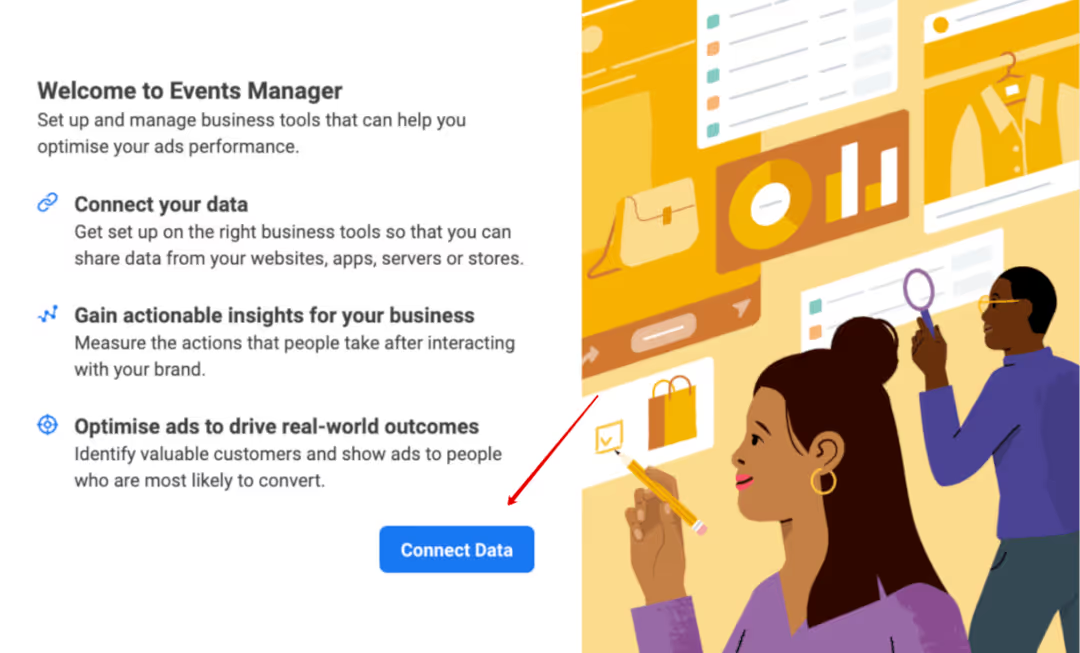
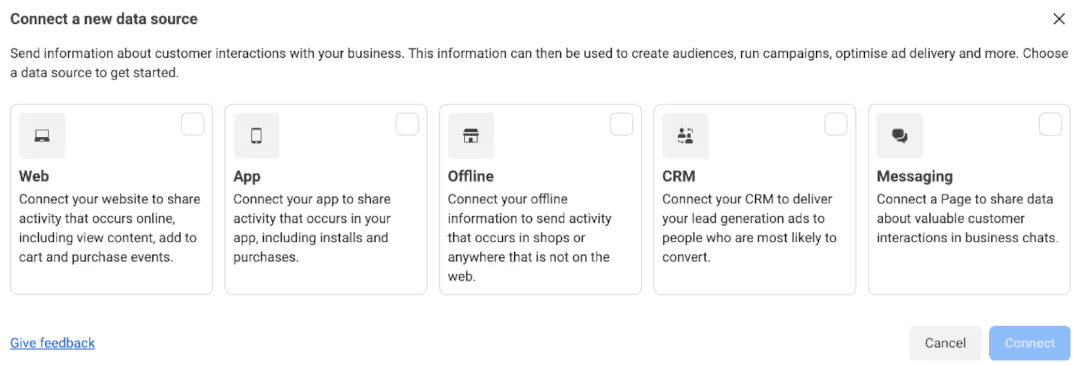
II. Once clicked, you’ll see a popup with the available data source options. Depending on your region, you may see a different view centered around the Meta Pixel.
III. Make sure you set up your Meta Pixel by following the instructions in this guide. In this article, we’ll focus on creating a dataset.
IV. We’ll be setting up web events, so select ‘Web’ and click ‘Connect.’
V. Meta will prompt you to name your new dataset, then click ‘Create.’
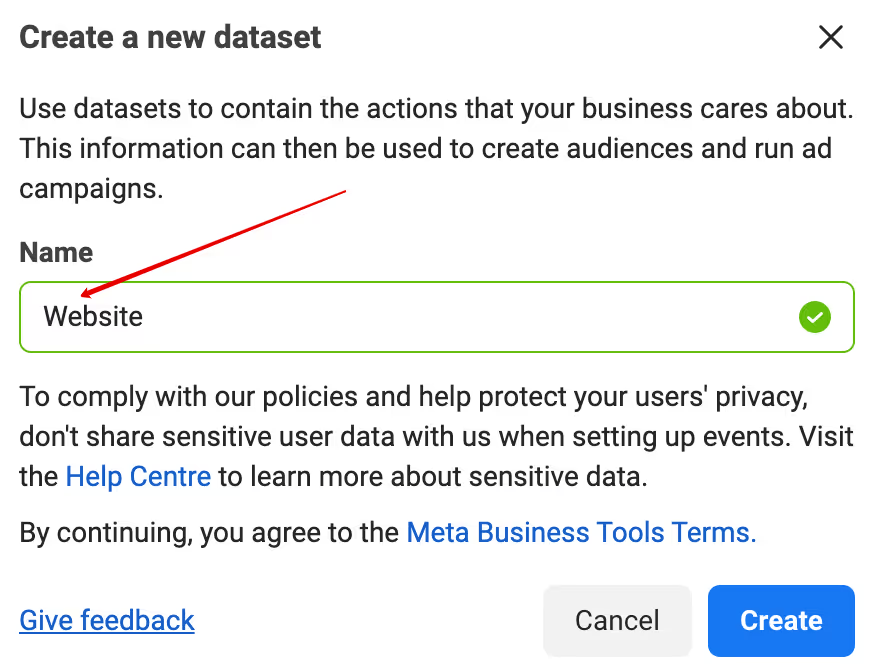
If you click out of this process, you can resume it by going back to the ‘Data Sources’ page.
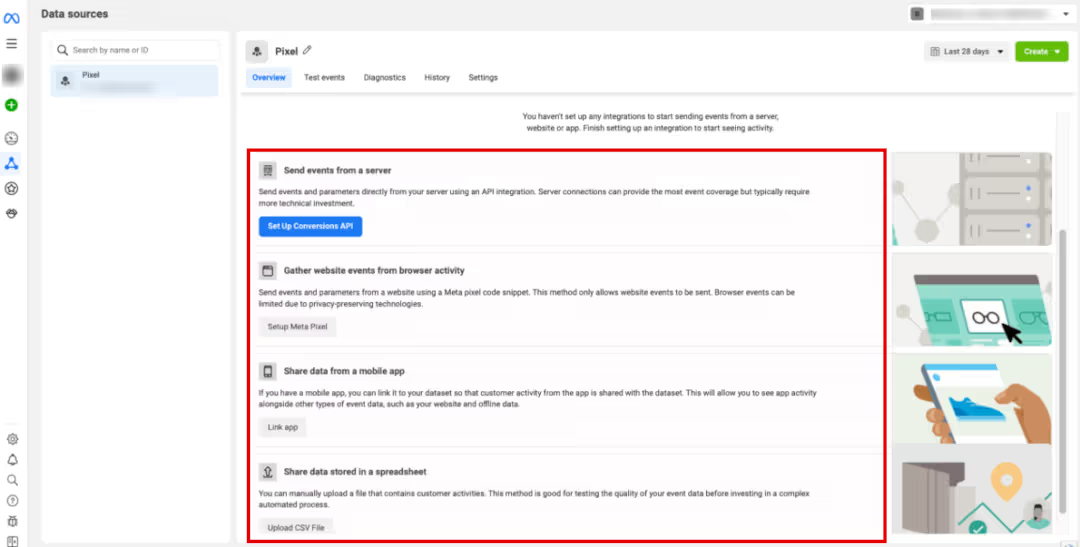
Once created, you can share your dataset or Pixel with another Business Manager or Ad account to collaborate on your campaigns in Ads Manager.
VI. Connect your Pixel/dataset code to your website. Do this by copying and pasting a code snippet into the header of the website pages you want to track or using a partner integration. Again, you can follow these instructions to do this.
VII. Link your new dataset to your other business assets in Business Manager to ensure it's connected to the Ads Manager.
VIII. Go to ‘Business settings,’ then ‘Datasets,’ and select your Pixel or dataset. In the window on the right, you will see a button to ‘Assign assets’ where you can add your Facebook Page, Instagram account, ad account, app, or Commerce account to your Pixel.

In addition, you can assign people or Partners who need access to your Facebook Pixel from the relevant tabs here.
IX. Check your Pixel/dataset is sending data using the Meta Pixel Helper.
Notes:
- When creating your dataset, ensure you’ve set up your Meta Business Manager account properly to see all five options, or some will be greyed out and unavailable.
2. Configure your dataset settings
In the Events Manager ‘Settings’ tab, you will be able to:
- View the ID and owner of your data
- View sharing controls and permissions
- Select your cookie settings
- Manage advanced matching
- Use the event setup tool
- Set up the Conversions API
- Control traffic permissions
Starting at the top, work your way down the settings to configure your new dataset.
When you get to ‘Website settings,’ turn on first-party cookies and automatic advanced matching by sliding the toggle. Doing this will improve your targeting on Facebook.
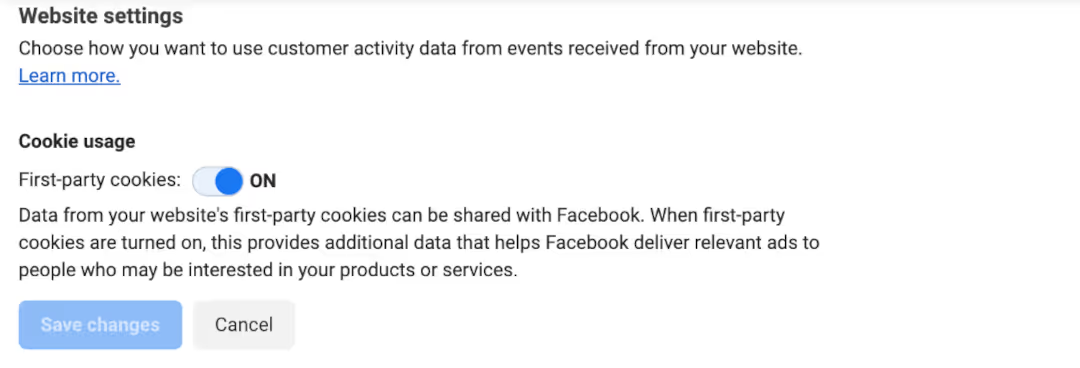

Underneath this section, you will be able to extend your attribution window, which records the ad that’s responsible for each conversion. Plus, you can extend the historical conversion upload settings by 90 days, giving you more time to upload this data.
Lastly, you can turn on automatic event logging for the Facebook SDK if you have a mobile app.

3. Verify your domain
While Meta says this step is no longer necessary to set up event tracking, I still highly recommend it for these reasons:
- You want to sell on Facebook - Meta requires that you have a website to associate with the Facebook Page and Instagram account to sell on Facebook and Instagram using Commerce Manager
- You want to have a say over which conversion events are eligible for your domain with Aggregated Event Measurement instead of using the default ones that Meta sets and prioritizes for you
- You want to manage ad link editing permissions across your team
- You want to see other advertisers that point to your domain to have tighter control over your brand
- You have multiple Facebook Pages for one business, like brand pages for different countries
- Your email doesn’t match your website domain - Meta must confirm you have control over your domain name
- Your business doesn’t have a phone number - the same reason as above
You can verify your domain in these three ways:
- Add a metatag to your domain’s home page
- Upload an HTML file to your website and confirm ownership in Business Manager
- Add a DNS TXT entry to your DNS records to confirm ownership of your domain
Go to ‘Settings’ in your Business Manager, head to ‘Brand Safety,’ and then ‘Domains.’ Click on add new to add your domain, or you can click ‘Request access to a domain’ if you need to access a domain on behalf of another business.
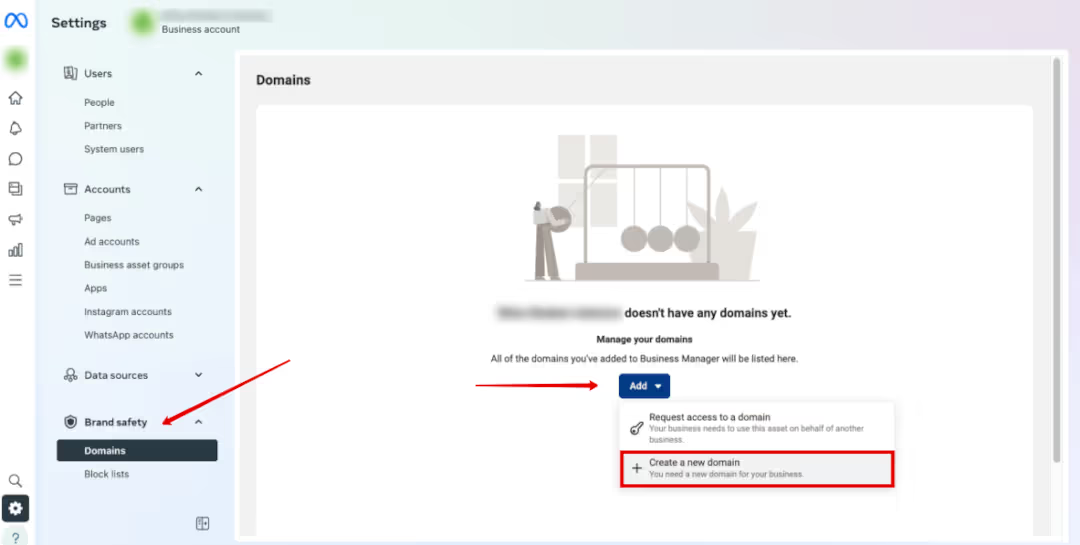
In the popup that appears, you must type in your domain and click ‘Next.’
You’ll get to the screen below, where you can select the verification method of the three options mentioned above. Follow the instructions in the middle section, and once complete, you can click the ‘Verify Domain’ button.
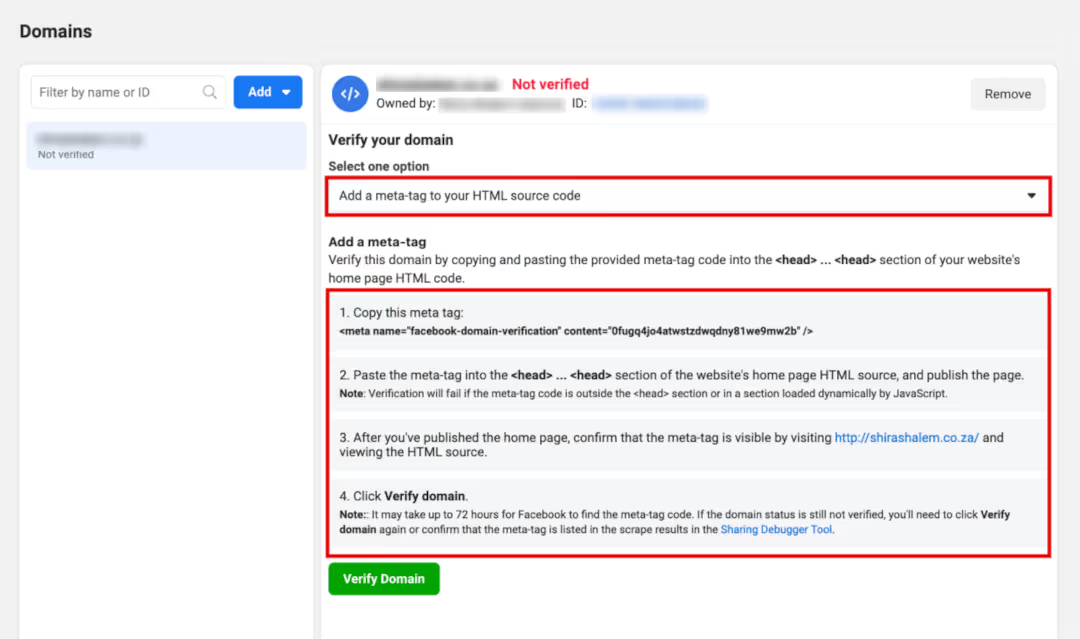
You can find more detailed instructions on verifying your domain in these ways in the Meta Business Help Centre.
Notes:
- Before you start, ensure you have a business account in Business Manager, full control of the business account, and admin or developer access to your domain.
- You can't edit organic or unpublished Page post links unless you verify your domains in Business Manager.
- If you choose the DNS TXT entry method, you’ll need to give it some time for the DNS records to update globally before you can complete the verification process.
4. Set up the Conversions API
Before you zone out at the complex wording, remember that the Conversions API allows you to send event data from your server directly to Facebook, bypassing the need to use browser cookies that people can opt out of or block.
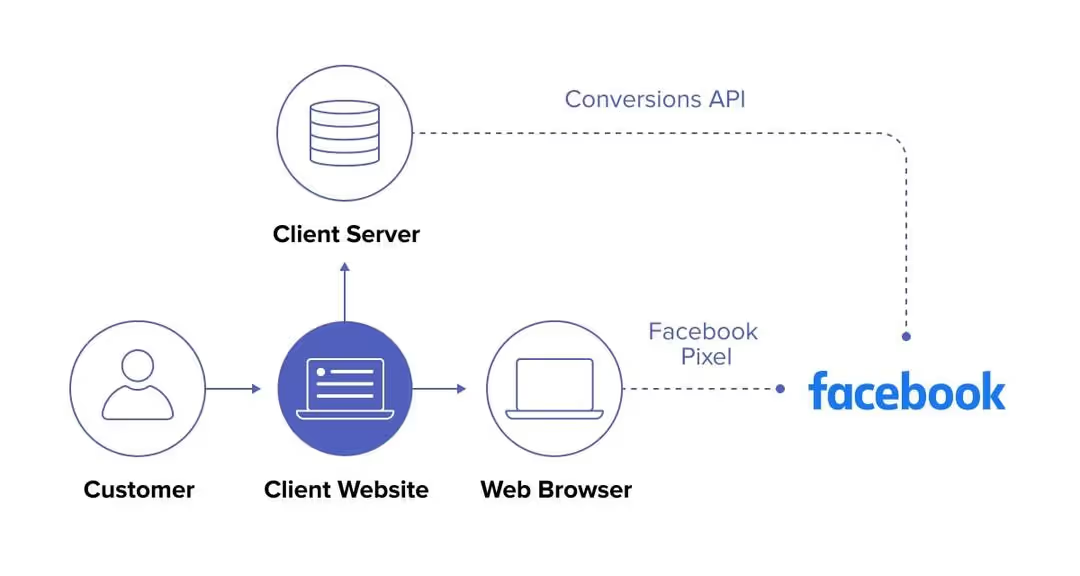
There are a few ways to set up the Conversions API, and each method has its pros and cons. You can:
- Set up your own gateway. This is the only way to ensure first-party tracking and requires a developer and AWS account to set up. Alternatively, you can use Madgicx Cloud Tracking, where we do all the dev work for you in just 2 days.
- Choose a partner integration. This way is easier but not ideal as you are using third-party data and will require the setup of the Partner app you are using.
The Conversions API setup is an intricate process that takes between 30 and 60 minutes, which I won’t delve into here, but you can follow the steps in this article to set it up.
5. Add events
Further down the ‘Settings’ tab of your dataset in the ‘Data Sources’ tab in Events Manager, you’ll find this button to open the Event Setup Tool. You can also slide the toggle to automatically track events without installing any code.

- Before this next step, you must turn off any ad blockers you may have installed on your browser, or this process won’t work. Next, enter your website URL and click ‘Open Website.’
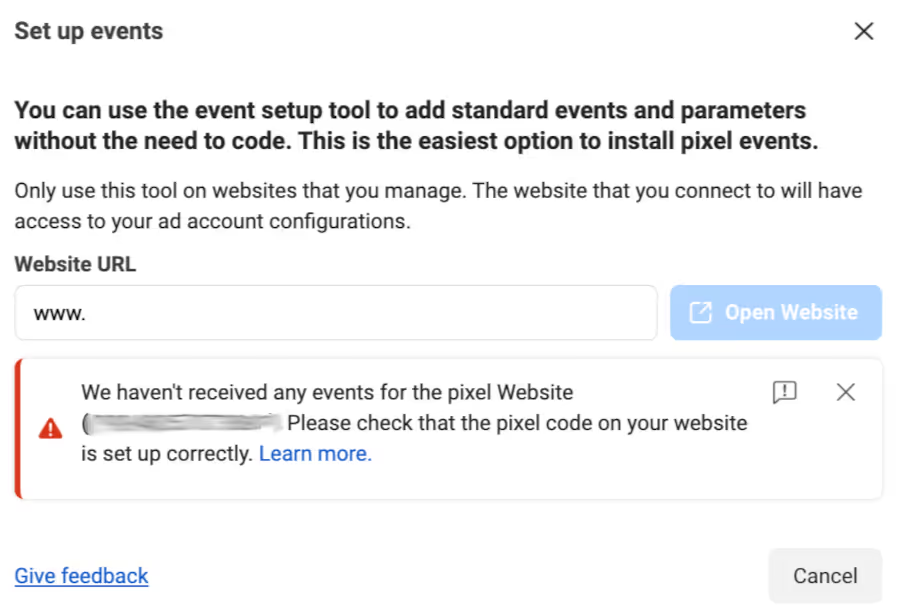
- The setup tool will launch in your browser, where you can either choose a button or define a URL to track specific events.
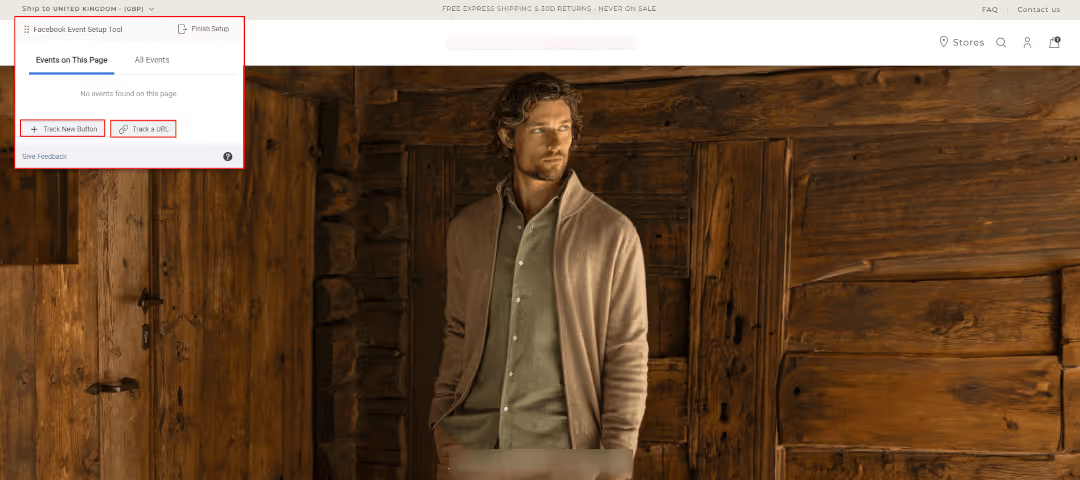
- Click ‘Review’ next to each suggested event and either ‘Confirm’ or ‘Dismiss’ it.
- To add events that don't appear in your suggested list, navigate your website as usual to find the buttons or web pages with events you want to include. Select ‘Track new button’ or ‘Track a URL’ and follow the onscreen instructions.
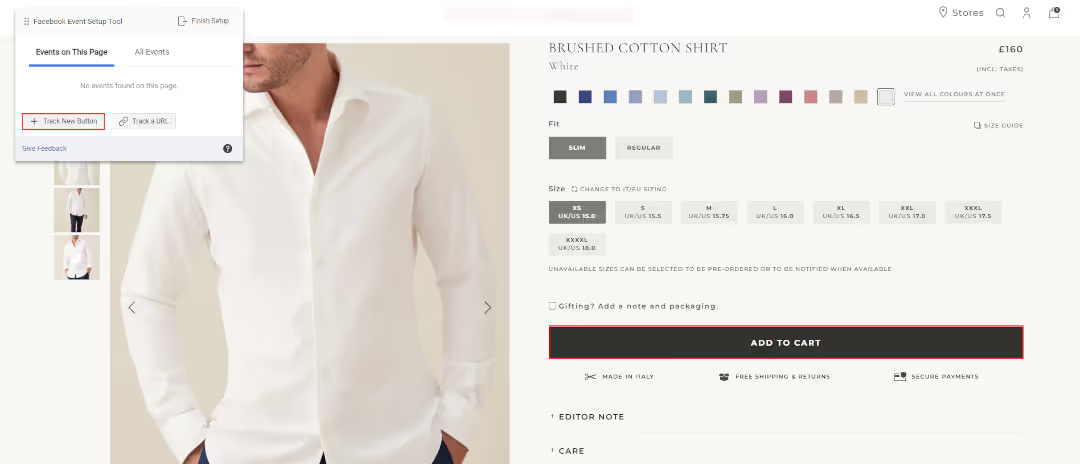
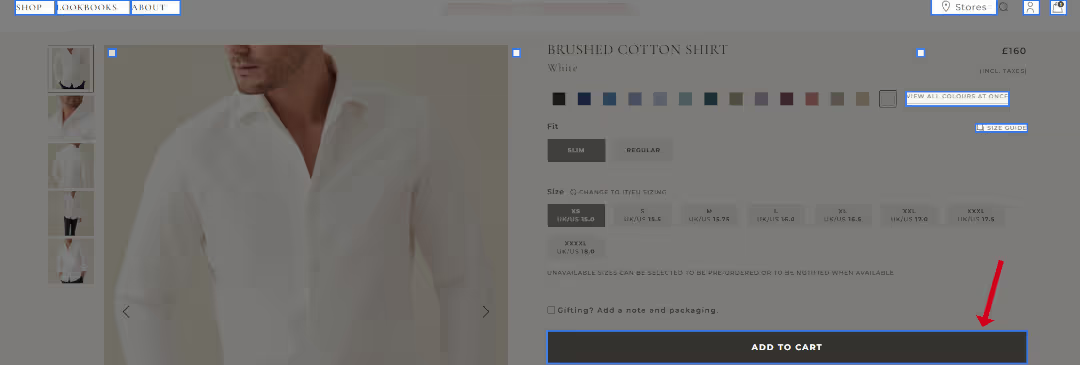
- You’ll need to click on the button you want to track.
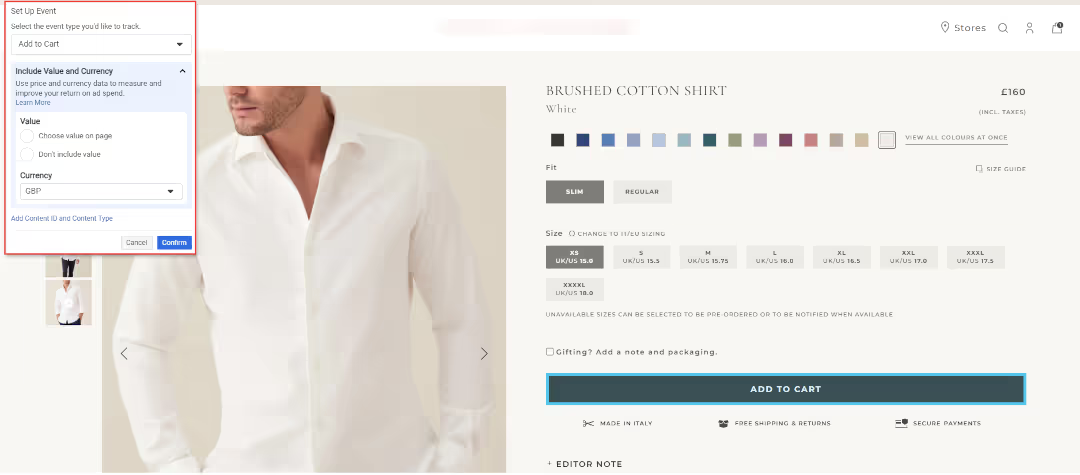
- Lastly, you’ll need to set up your event parameters, including the value where you can link your prices and select your currency from the dropdown menu.
Note:
- If you've already set up the corresponding initiate checkout event, you'll have the option to select ‘Use value from initiate checkout’ when you set up the purchase event. The tool will automatically add the same value you set for the initiate checkout event to the purchase event. If the ‘Use value from initiate checkout’ option is unavailable, select ‘Choose value on page’ instead.
6. Connect an offline data source
You can track offline conversions like phone calls, bookings, appointments, or even CRM activity. If this applies to your business, you should create a new offline dataset.
Just as we’ve gone through setting up your web events, you should add your offline events and any others you can. Doing this ensures that you cover all your bases and leave nothing untracked.
- To add more data sources, click the green plus on the top left of the side menu that says ‘Connect data sources.’
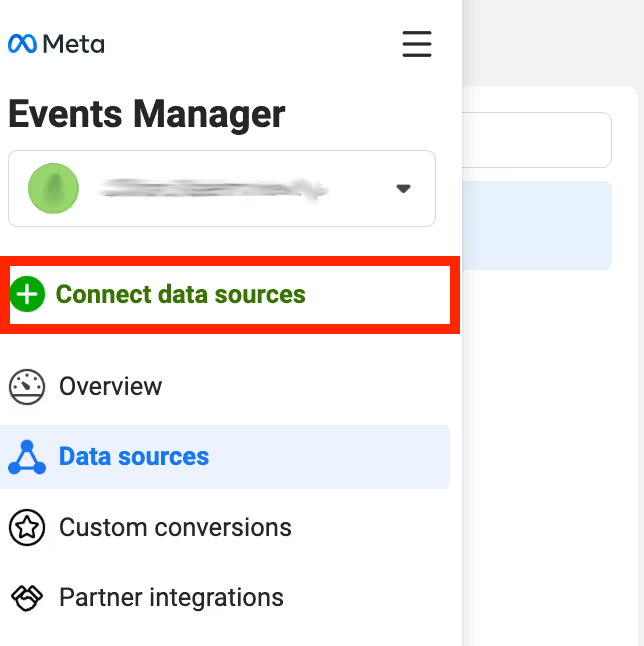
- Choose the ‘Offline’ option and click the ‘Connect’ button, then name your dataset accordingly.

- Meta will guide you through this process according to your selection, but you can upload events using a .csv file, from web activity, import data from your CRM, and use the Conversions API.
7. Create custom conversions
Not all businesses need to set up custom conversions, but e-commerce businesses use this often. Custom conversions let you filter your purchase events more to segment your audience and create highly personalized ads for them. Here is how to create a custom conversion:
- On the Custom Conversions tab in the Meta Events Manager, click ‘Create Custom Conversion.’
- Here you can enter the details of your custom conversion and set the parameters.
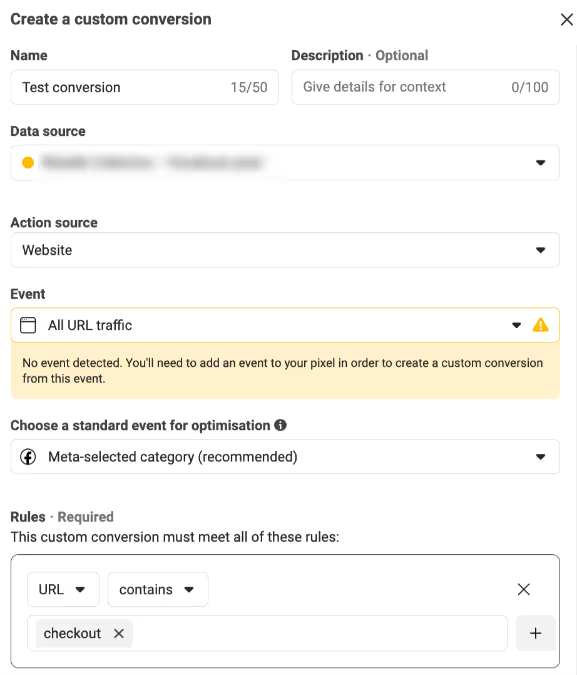
You can add multiple rules to define your custom conversion by including or excluding specific words in the URL or setting a specific URL. Plus, you can assign a monetary value to it.
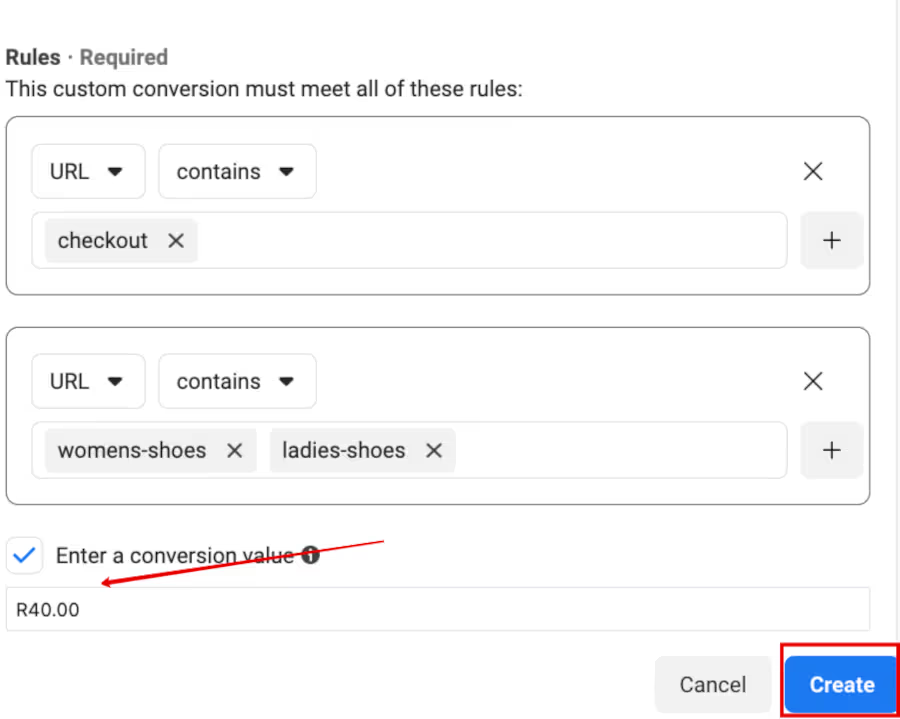
- Click ‘Create’ once you’re done, and you’ll see a confirmation message like this:

Your custom conversion has been created.
8. Test your events
Creating your events isn’t enough; you must make sure they fire properly and are tracked correctly. You can do this by heading to the ‘Test events’ tab once you select the data source you want to check. The test events tool can check the connection to the Facebook SDK, a Mobile Measurement Partner, the App Events API, or the Meta Pixel. You can:
- Check that your events have been set up correctly and Meta is receiving them
- Debug any unusual activity
- Check your deduplication setup on web events only (to ensure no duplicate events are being logged)
How to test your events:
I. Select the dataset in Data Sources that you want to test and click on ‘Test events.’
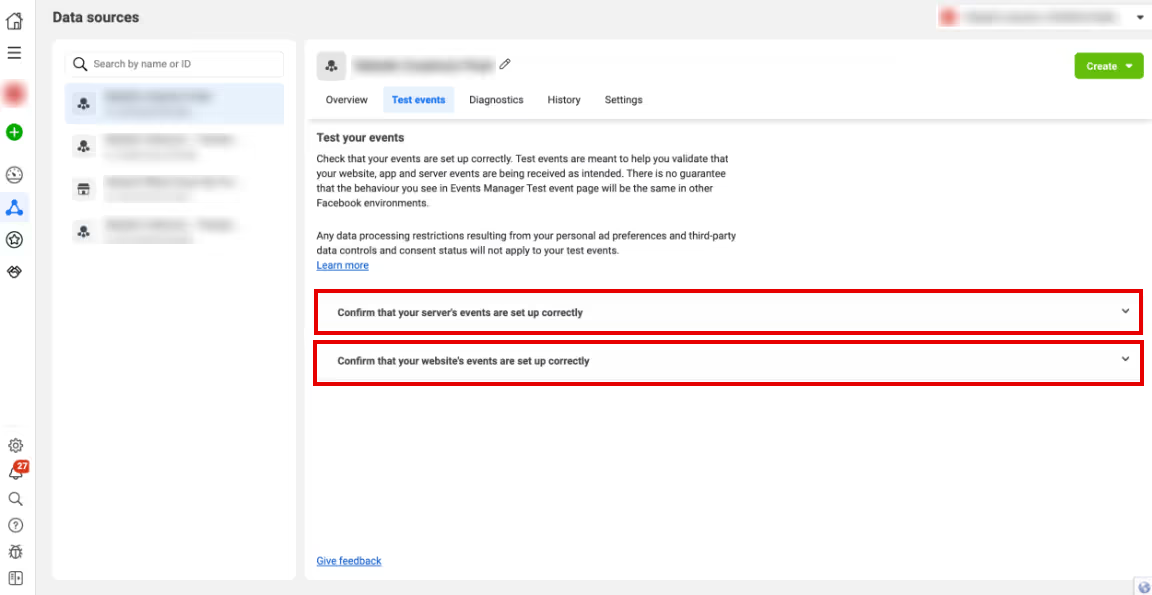
You can test if your server or website events are set up correctly, so choose the one that you want to check.
II. For server events, you can follow Meta’s instructions to double-check that your test code is correct. Open the Graph API Explorer to check your payload matches the test event code where the arrow is pointing.

III. Then, for website events, you can enter your website URL and click ‘Open Website’ to open it in a new tab.

IV. You can interact with your website to test your events, and they should all show up in the ‘Test events’ tab.
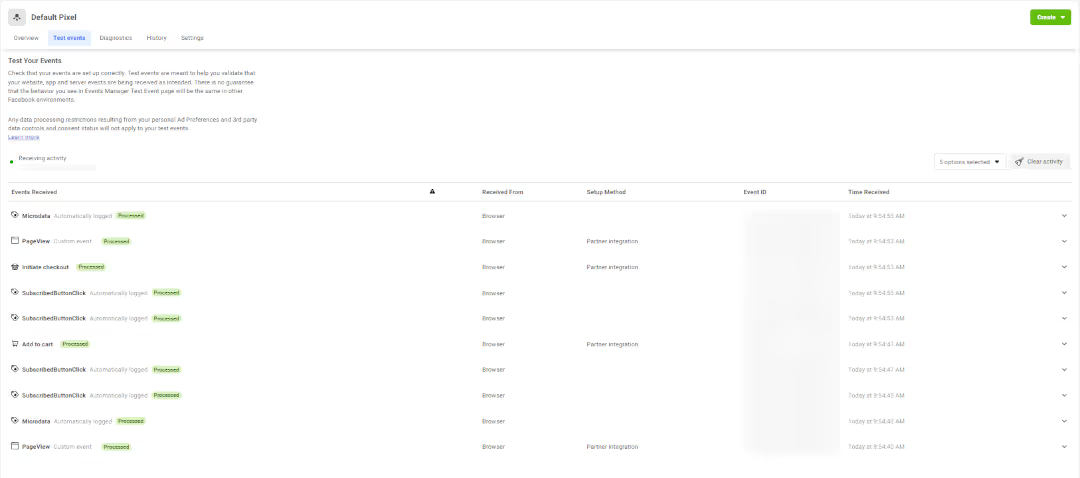
You can filter these events by activity type, like standard and custom events, and automatically log Pixel and app events. In addition, the activity details you can see include the URL, the parameters, and any active issues like errors or warning messages.
Notes:
- To test app events, do the website test from your phone.
- It may take 30 minutes or more after you've initially set up your event to see data in your Event Manager analytics. You can still use the test events tool in the meantime to verify the event.
- Any test information will remain in the ‘Test events’ tab for 24 hours or until you've cleared it.
- If your events don’t appear, you can troubleshoot this by reading this article.
9. Prioritize events
Due to recent Meta updates, this is no longer necessary when setting up a new dataset using the Aggregated Event Measurement protocol, but it’s something you can still do as long as you have verified your domain. Meta assigns this priority, and it’s very likely you won’t need to touch it.
What’s next? Analyze and optimize campaigns
Now you’ve gone to the trouble of setting up your web events, it’s time to use them to your advantage. It’s crucial to keep an eye on them and analyze your ad performance based on them. You can track your performance in the Meta Ads Manager or use more comprehensive tools, such as One-Click Report.
I won’t dive deeper into Facebook analytics and reporting here, but we have an excellent article about the topic you should read here.
Another thing you should do now is optimize your campaigns based on the events you defined in the Events Manager. You can do this by going to Meta Ads Manager and either creating or editing a sales, leads, or engagement ad campaign.
Next, go to the ad set, where you can set the performance goal of the campaign from a drop-down menu.

Click on the down arrow to open the drop-down list of available performance goals.
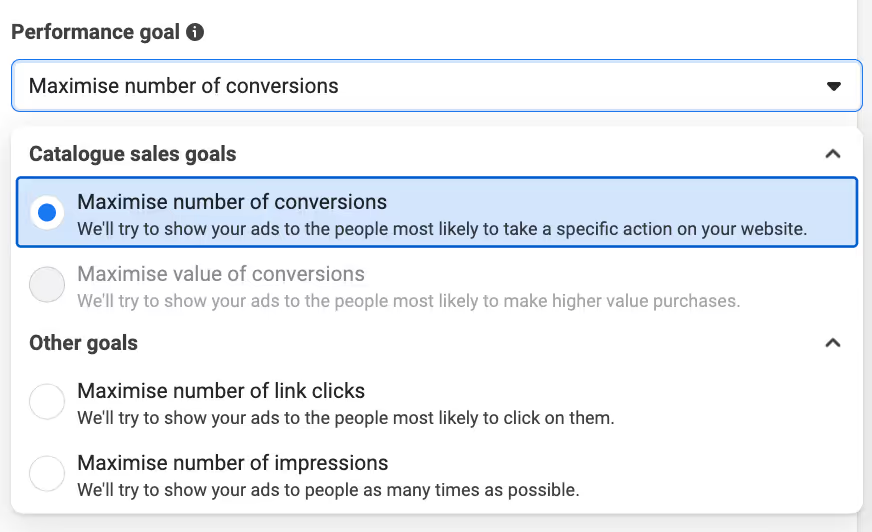
Then, choose the conversion event Meta should optimize the campaign for from the list, which is pulled from your Events Manager.

Make sure to set up your events a good few days before you launch your campaign. Newly created or edited events can take up to 72 hours before they become available to use for optimization.
As a final step, you should make sure your important data doesn’t slip through the cracks. Use Madgicx Cloud Tracking for reliable server-to-server tracking. Madgicx does all the heavy lifting to get you up and running, and you can try it free for 7 days. Give Madgicx Cloud Tracking a whirl.
Close the gap on undetected events with a reliable and compliant tracking solution. We set you up in 1 to 2 days - you don’t lift a finger. Try Madgicx Cloud Tracking for free for 7 days.
I use my agency experience in digital marketing and paid advertising to help business owners and advertisers navigate the tech landscape with my content.


.png)


